Alocasia Maharani Grey Dragon Care: Keeping Your Plant Healthy 

The Alocasia Maharani Grey Dragon is a rare and striking plant that has captured the attention of plant enthusiasts worldwide. With its compact size, uniquely textured foliage, and smoky grey hues, this plant exudes an exotic and mystical charm. Despite its intimidating appearance, caring for the Alocasia Maharani is relatively straightforward with the right guidance. This guide will provide detailed care tips to help you keep your Grey Dragon healthy and thriving.

1. Understanding Alocasia Maharani Grey Dragon

– Key Features:

– Compact size, growing up to 14 inches tall.

– Thick, leathery leaves with a silvery-grey texture resembling dragon scales.

– Known for its hardy nature compared to other Alocasias.

– Origin: This hybrid Alocasia was developed to withstand a wider range of conditions, making it more manageable for indoor gardeners.

2. Light Requirements

– Bright, Indirect Light: The Grey Dragon thrives in filtered sunlight, mimicking its natural tropical habitat.

– Avoid Direct Sunlight: Too much sun can scorch its delicate leaves.

– Low Light Tolerance: It can survive in lower light but may experience slower growth.

3. Ideal Temperature Range

– Preferred Temperature: 65°F–85°F (18°C–29°C).

– Avoid Cold Drafts: This plant is sensitive to temperatures below 60°F (15°C).

– Consistency is Key: Keep the environment stable to avoid stressing the plant.

4. Humidity Needs

– High Humidity: Aim for 60–80% to mimic its native tropical environment.

– Humidity Boost Tips:

– Place a humidifier nearby.

– Group with other plants to create a humid microclimate.

– Use a pebble tray with water under the pot.

5. Watering Schedule

– Water Moderately: Allow the top 1–2 inches of soil to dry out before watering.

– Consistency Matters: Overwatering or underwatering can cause stress.

– Signs to Watch:

– Drooping leaves may indicate underwatering.

– Yellowing leaves suggest overwatering.

6. Soil Requirements

– Well-Draining Soil:Prevents water from pooling and causing root rot.

– Recommended Soil Mix:

– 50% potting soil.

– 25% perlite or pumice for aeration.

– 25% orchid bark or coconut coir for organic matter.

7. Fertilization Tips

– When to Fertilize:Feed every 4–6 weeks during the growing season (spring and summer).

– Type of Fertilizer: Use a balanced liquid fertilizer diluted to half strength.

– Avoid Overfeeding: Excess nutrients can burn the roots.

8. Potting and Repotting

– Pot Choice: Use a container with drainage holes to prevent waterlogging.

– Repotting Frequency: Every 1–2 years, or when the plant becomes root-bound.

– Steps for Repotting:

  1. Gently remove the plant and inspect the roots.
  2. Trim any damaged or rotting roots.
  3. Repot in fresh soil with ample drainage.

9. Pest Management

– Common Pests:

– Spider Mites: Look for fine webbing on the undersides of leaves.

– Mealybugs: Cotton-like clusters on stems or leaves.

– Thrips: Tiny, slender insects that damage leaves.

– Prevention:

– Regularly clean leaves with a damp cloth.

– Maintain proper humidity to deter pests.

– Treatment: Use neem oil or insecticidal soap at the first sign of infestation.

10. Dormancy Periods

– Dormancy in Winter:Growth slows, and the plant may drop a few leaves.

– Care During Dormancy:

– Reduce watering, but don’t let the soil dry out completely.

– Stop fertilizing until new growth resumes in spring.

11. Pruning and Maintenance

– Remove Yellow or Damaged Leaves: Use sterilized scissors to maintain a neat appearance.

– Dust Regularly: Clean the leaves to enhance photosynthesis and prevent pests.

12. Propagation Methods

Propagation of the Grey Dragon is best achieved through division.

– When to Propagate During repotting in spring or summer.

– Steps for Propagation:

  1. Gently separate the offsets (baby plants) from the mother plant.
  2. Ensure each offset has a healthy root system.
  3. Pot in fresh soil and water lightly.

13. Common Problems and Solutions

– Yellowing Leaves:

– Cause: Overwatering or poor drainage.

– Solution: Adjust watering and improve soil aeration.

– Brown Leaf Edges:

– Cause: Low humidity or underwatering.

– Solution: Increase humidity and check soil moisture.

– Drooping Foliage:

– Cause: Underwatering or sudden environmental changes.

– Solution: Water consistently and maintain a stable environment.

14. Decorating with Alocasia Maharani Grey Dragon

– Indoor Placement: Perfect for desks, shelves, or as a centerpiece in small spaces.

– Pot Styling: Pair with modern or minimalist pots to highlight its unique foliage.

15. Why Add Alocasia Maharani to Your Collection?

– Exotic Appearance: Its dragon-scale-like leaves make it a conversation starter.

– Compact Size: Ideal for small spaces or indoor gardens.

– Beginner-Friendly: Hardy nature makes it suitable for those new to Alocasia care.

Conclusion

The Alocasia Maharani Grey Dragon is a show-stopping plant that thrives with a bit of attention and care. By providing the right balance of light, humidity, and watering, you can enjoy the beauty of its textured, silvery leaves for years to come. Whether you’re a seasoned plant parent or a beginner, the Grey Dragon is a fantastic addition to any indoor garden. With the tips in this guide, you’ll ensure that your Alocasia Maharani remains healthy, vibrant, and the crown jewel of your plant collection. With its otherworldly appearance, this plant has become a must-have for collectors and enthusiasts alike. However, due to its rarity, finding an Alocasia Cuprea for sale can sometimes feel like a treasure hunt. This guide will help you navigate the best sources, both online and offline, to purchase this exotic beauty and bring it into your plant collection.
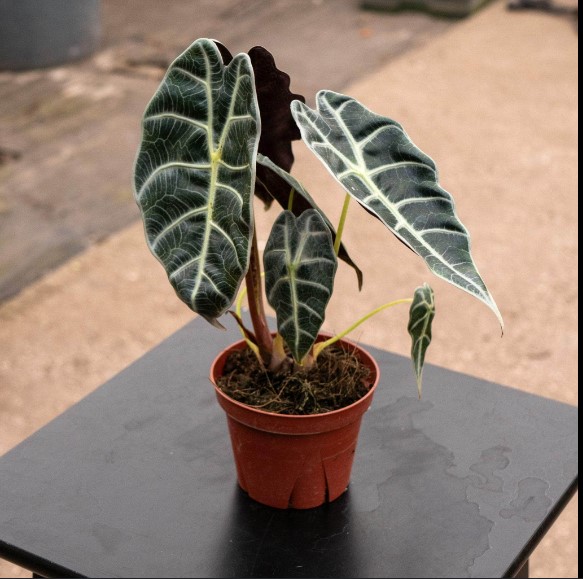
Big Alocasia Amazonica: How to Care for This Majestic Indoor Plant 


The Alocasia Amazonica, often referred to as the African Mask Plant, is a striking indoor plant known for its dramatic foliage and bold appearance. While smaller varieties of Alocasia Amazonica are popular among houseplant enthusiasts, larger specimens create a truly majestic statement in any indoor space. With its glossy, arrow-shaped leaves featuring prominent white veins, this plant demands attention—and the right care to thrive. Whether you’re an experienced indoor gardener or new to Alocasias, this guide provides everything you need to know about caring for a **big Alocasia Amazonica.

1. Understanding Alocasia Amazonica

Alocasia Amazonica is a hybrid plant with origins in tropical Asia, despite its name suggesting a connection to the Amazon. Its lush, exotic appearance mimics the beauty of tropical rainforests, making it a favorite for plant lovers.

– Key Features:

– Large, glossy leaves with deep green tones and contrasting white veins.

– Upright growth, ideal for adding height to indoor gardens.

– Requires specific care to maintain its bold appearance.

2. Light Requirements

– Bright, Indirect Light: The Alocasia Amazonica thrives in bright, filtered sunlight, similar to its natural habitat under the rainforest canopy.

– Avoid Direct Sunlight: Harsh rays can scorch its delicate leaves.

– Low-Light Tolerance: It can survive in lower light but may grow more slowly.

3. Temperature Needs

Alocasia Amazonica loves warmth and doesn’t tolerate cold drafts.

– Ideal Temperature: 65°F–85°F (18°C–29°C).

– Avoid Cold Stress: Never let the temperature drop below 60°F (15°C).

4. Humidity Levels

As a tropical plant, Alocasia Amazonica requires high humidity to thrive.

– Optimal Humidity: 60–80%.

– Boosting Humidity:

– Place a humidifier nearby.

– Mist the leaves regularly with room-temperature water.

– Use a pebble tray filled with water under the pot.

5. Watering Schedule

Getting the watering routine right is critical for big Alocasia Amazonica plants.

– Frequency: Water when the top 1–2 inches of soil feel dry.

– Amount: Water evenly until it drains out of the pot, ensuring no stagnant water remains in the saucer.

– Avoid Overwatering: This plant is prone to root rot if left in soggy soil.

6. Soil Recommendations

The right soil mix is essential for maintaining healthy roots.

– Well-Draining Soil: Use a mix of potting soil, perlite, and orchid bark for proper aeration.

– Nutrient-Rich Base: The soil should be rich in organic matter to support its large leaves.

– pH Range: Slightly acidic to neutral (6.0–7.0).

7. Fertilizing Tips

Alocasia Amazonica’s fast growth and large leaves require regular feeding.

– Frequency: Fertilize every 4–6 weeks during spring and summer.

– Type: Use a balanced liquid fertilizer diluted to half strength.

– Skip Fertilizing: Avoid feeding during dormancy in fall and winter.

8. Potting and Repotting

Large Alocasia Amazonica plants need a sturdy pot to support their size.

– Choosing a Pot: Use a pot with drainage holes to prevent waterlogging.

– Repotting Frequency: Repot every 1–2 years or when the plant becomes root-bound.

– Steps for Repotting:

  1. Carefully remove the plant from its current pot.
  2. Inspect and trim any damaged roots.
  3. Replant in fresh soil and water thoroughly.

9. Pest Prevention and Treatment

Like other tropical plants, Alocasia Amazonica can attract pests such as:

– Spider Mites: Look for webbing on the leaves.

– Mealybugs: Small, cottony spots on stems and leaves.

– Scale: Brown, shell-like bumps on the plant.

Prevention Tips:

– Regularly clean the leaves with a damp cloth.

– Inspect the plant during watering.

Treatment: Use neem oil or insecticidal soap to address infestations.

10. Managing Dormancy Periods

Alocasia Amazonica may enter dormancy during cooler months.

– Signs of Dormancy: Slower growth, occasional leaf drop, or no new growth.

– Care During Dormancy:

– Reduce watering but don’t let the soil dry out completely.

– Maintain consistent humidity and warmth.

– Resume regular care when new growth appears in spring.

11. Pruning and Maintenance

– Prune Yellow or Damaged Leaves: Use sterilized scissors to remove unsightly foliage.

– Wipe Leaves Regularly: Dust can accumulate on its large leaves, reducing photosynthesis.

12. Propagating Alocasia Amazonica

Propagation is best done through division.

– Best Time: During repotting in spring or early summer.

– Steps:

  1. Gently separate the rhizomes with their roots intact.
  2. Plant each division in its pot with fresh soil.
  3. Water lightly and keep in a warm, humid environment.

13. Common Problems and Solutions

– Yellowing Leaves:

– Cause: Overwatering or poor drainage.

– Solution: Adjust watering and ensure the soil drains well.

– Brown Leaf Edges:

– Cause: Low humidity or fertilizer burn.

– Solution: Increase humidity and reduce fertilizer strength.

– Drooping Leaves:

– Cause: Underwatering or sudden environmental changes.

– Solution: Check soil moisture and maintain consistent conditions.

14. Decorating with Big Alocasia Amazonica

– Indoor Placement: Perfect as a focal point in living rooms, offices, or large entryways.

– Pot Styling: Pair with minimalist or decorative pots to highlight its bold foliage.

15. Why Choose Big Alocasia Amazonica?

– Tropical Elegance: Adds a dramatic touch to any indoor space.

– Air Purifier: Improves indoor air quality.

– Collector’s Favorite: A unique addition for plant enthusiasts.

Conclusion

Caring for a big Alocasia Amazonica requires attention to light, humidity, and watering, but the effort is well worth it. This majestic indoor plant not only elevates the aesthetic of your space but also provides a rewarding experience for plant lovers. With proper care, your Alocasia Amazonica can thrive, showcasing its bold, tropical beauty for years to come.

Exploring Alocasia Varieties: The Unique Features of Alocasia Sp Borneo 


The Alocasia Sp Borneo stands out as one of the most captivating varieties of Alocasia, drawing attention from plant collectors and enthusiasts worldwide. Native to the lush rainforests of Borneo, this plant embodies the exotic charm of its tropical origins. Its stunning foliage and unique growth patterns make it a prized addition to any plant collection. In this article, we’ll delve into the characteristics, care requirements, and fascinating features that set the Alocasia Sp Borneo apart from other varieties.

1. Origins of Alocasia Sp Borneo

The Alocasia Sp Borneo originates from the dense tropical rainforests of Borneo, where it thrives under the forest canopy. This natural habitat gives the plant its distinctive features, such as its love for humidity and bright, filtered light.

2. Key Features of Alocasia Sp Borneo

– Distinctive Foliage:

– Large, arrow-shaped leaves with deep green hues.

– Prominent, textured veins that create an elegant contrast.

– Compact Growth: Ideal for indoor spaces and smaller gardens.

– Glossy Finish: The leaves have a natural shine that enhances their visual appeal.

3. Why Collectors Love Alocasia Sp Borneo

– Exotic Appeal: Its tropical origins make it a standout piece in any collection.

– Rare Availability: Not as common as other Alocasia varieties, adding to its desirability.

– Aesthetic Value: Combines bold structure with intricate details.

4. Light Requirements for Alocasia Sp Borneo

– Bright, Indirect Light: Mimics the dappled sunlight of its native rainforest.

– Avoid Direct Sunlight: Prolonged exposure can scorch the leaves.

– Artificial Lighting: Can thrive under grow lights in low-light indoor settings.

5. Watering Needs

– Consistent Moisture: Keep the soil consistently moist but not soggy.

– Watering Frequency: Check the top 1–2 inches of soil; water when slightly dry.

– Avoid Overwatering: Excess water can lead to root rot, a common issue for Alocasia.

6. Soil Preferences

The right soil mix is crucial for the health of Alocasia Sp Borneo.

– Well-Draining Soil: Use a mix of potting soil, perlite, and orchid bark.

– Nutrient-Rich Base: Ensures steady growth and vibrant foliage.

– Acidic to Neutral pH: Aim for a pH between 6.0 and 7.0.

7. Humidity and Temperature

– Humidity: Prefers 60–80% humidity, mimicking its tropical habitat.

– Use a humidifier or pebble tray for indoor environments.

– Temperature: Keep between 65°F and 85°F (18°C–29°C). Avoid sudden temperature drops.

8. Fertilizing Tips

– Frequency: Feed every 4–6 weeks during the growing season (spring and summer).

– Type of Fertilizer: Use a balanced, water-soluble fertilizer.

– Dilution: Always dilute to half strength to prevent root burn.

9. Pest Management

Like many tropical plants, Alocasia Sp Borneo is prone to pests such as:

– Spider Mites: Look for fine webbing on the leaves.

– Mealybugs: Small, cotton-like clusters often appear on stems.

– Treatment: Use neem oil or insecticidal soap to treat infestations.

10. Dormancy Periods

The plant may go dormant during cooler months, reducing its growth rate.

– Signs of Dormancy: Leaves may yellow or drop, and growth slows significantly.

– Winter Care: Reduce watering and stop fertilizing until new growth emerges in spring.

11. Propagation Methods

Propagation of Alocasia Sp Borneo can be achieved through rhizome division.

– Best Time: During repotting in spring or summer.

– Steps:

  1. Gently remove the plant from its pot and locate the rhizomes.
  2. Separate sections with healthy roots and leaves.
  3. Plant each division in fresh soil and water lightly.

12. Common Issues and Solutions

– Yellowing Leaves:

– Likely caused by overwatering. Adjust your watering schedule.

– Browning Edges:

– Indicates low humidity. Increase moisture levels around the plant.

– Drooping Foliage:

– Could result from underwatering or sudden temperature changes.

13. Decorating with Alocasia Sp Borneo

– Indoor Placement: Perfect for living rooms, offices, or conservatories.

– Pairing with Pots: Use simple, neutral-toned pots to emphasize the plant’s vibrant foliage.

14. Comparing Alocasia Sp Borneo to Other Varieties

– Alocasia Zebrina: Features striped stems, whereas Sp Borneo focuses on its bold leaf texture.

– Alocasia Polly: More compact and widely available, but lacks the unique vein structure of Sp Borneo.

15. Why Add Alocasia Sp Borneo to Your Collection?

– Unique Aesthetic: Its bold, intricate leaves make it a conversation starter.

– Tropical Flair: Brings the beauty of Borneo’s rainforests into your home.

– Collector’s Item: A rare and valuable addition to any plant enthusiast’s collection.

Conclusion

The Alocasia Sp Borneo is an exotic treasure that captivates with its dramatic foliage and tropical charm. While it requires a bit more attention than common houseplants, the reward of nurturing such a stunning variety is well worth the effort. Whether you’re an avid collector or a beginner looking to expand your indoor garden, the Alocasia Sp Borneo is a plant that promises to impress and elevate your plant collection. Caring for a big Alocasia Amazonica requires attention to light, humidity, and watering, but the effort is well worth it. This majestic indoor plant not only elevates the aesthetic of your space but also provides a rewarding experience for plant lovers. With proper care, your Alocasia Amazonica can thrive, showcasing its bold, tropical beauty for years to come. Despite its intimidating appearance, caring for the Alocasia Maharani is relatively straightforward with the right guidance. This guide will provide detailed care tips to help you keep your Grey Dragon healthy and thriving.

What Kind of Soil Does Alocasia Polly Need? Expert Tips for Optimal Growth 

The Alocasia Polly, also known as the African Mask Plant, is a stunning houseplant prized for its striking foliage and unique veined patterns. However, like many tropical plants, its health and vibrancy heavily depend on the soil it’s planted in. Providing the right soil mix ensures proper drainage, aeration, and nutrient availability, all of which are crucial for the plant’s long-term growth and health. This guide will help you understand the ideal soil conditions for Alocasia Polly and how to prepare the perfect mix for optimal growth.

1. Why Soil Matters for Alocasia Polly

Alocasia Polly is native to tropical rainforests, where the soil is rich, well-draining, and consistently moist. Mimicking these conditions in your potting mix is key to preventing common issues like root rot or nutrient deficiencies.

2. Key Characteristics of the Ideal Soil

The best soil for Alocasia Polly should:

– Drain Well: Prevents waterlogging and reduces the risk of root rot.

– Retain Moisture: Ensures the roots remain hydrated without becoming overly saturated.

– Be Nutrient-Rich: Supports healthy foliage and growth.

– Allow Airflow: Promotes root aeration and prevents compaction.

3. Ingredients for the Perfect Soil Mix

Creating a well-balanced soil mix requires combining several components:

  1. Potting Soil: Acts as the base, providing essential nutrients.
  2. Perlite or Pumice: Improves drainage and aeration.
  3. Orchid Bark: Adds structure and prevents soil compaction.
  4. Coconut Coir or Peat Moss:Retains moisture without becoming waterlogged.

4. Recommended Soil Mix for Alocasia Polly

For optimal growth, mix the following:

– 50% high-quality potting soil.

– 20% perlite or pumice.

– 20% orchid bark or coarse sand.

– 10% coconut coir or peat moss.

This combination ensures a balance of moisture retention, drainage, and nutrient supply.

5. pH Levels and Alocasia Polly

– Ideal pH Range: Slightly acidic to neutral (6.0–7.0).

– Why pH Matters: Maintaining the correct pH allows the plant to absorb nutrients effectively.

– Testing Your Soil: Use a soil pH test kit to monitor acidity and adjust if necessary.

6. Common Soil Problems and Solutions

– Problem: Soil stays too wet.

– Solution: Add more perlite or sand to improve drainage.

– Problem: Soil dries out too quickly.

– Solution: Increase the amount of coconut coir or peat moss.

– Problem: Nutrient deficiencies.

– Solution: Add organic compost or use a balanced liquid fertilizer.

7. Pre-Made Soil Options

If you prefer not to mix your own soil, several pre-made options work well for Alocasia Polly:

– Aroid Mixes: Designed for tropical plants, these mixes often contain the right balance of drainage and moisture retention.

– Cactus and Succulent Mix: Use with added coconut coir for improved moisture retention.

8. Potting Tips for Alocasia Polly

When potting Alocasia Polly, follow these tips to ensure the soil supports healthy growth:

– Use a Pot with Drainage Holes: Prevents water from accumulating at the bottom.

– Layer the Bottom: Add a thin layer of gravel or small stones for extra drainage.

– Repot When Needed: Refresh the soil every 1–2 years to maintain nutrient availability.

9. Watering and Soil Interaction

The soil’s composition directly impacts your watering routine:

– Check Moisture Levels: Insert your finger into the soil; water only when the top 2 inches feel dry.

– Avoid Waterlogging: Ensure water flows freely through the soil and out of the pot.

– Use Room-Temperature Water: Cold water can shock the roots.

10. Fertilizing Alocasia Polly in Soil

– When to Fertilize: During the growing season (spring and summer).

– Type of Fertilizer: Use a balanced liquid fertilizer diluted to half strength.

– Avoid Over-Fertilization: Excess salts can build up in the soil, damaging roots.

11. Seasonal Soil Care

– Spring and Summer: Increase watering and fertilizing frequency as the plant grows actively.

– Fall and Winter: Reduce watering and stop fertilizing to prevent over-saturation during dormancy.

12. Signs of Healthy Soil

Your soil mix is working well if you observe:

– Steady growth and vibrant leaves.

– Moist but not soggy soil after watering.

– No signs of mold, pests, or root rot.

13. Common Mistakes to Avoid

– Using garden soil, which is too dense and may contain pests.

– Ignoring drainage holes in pots, leading to water accumulation.

– Overwatering, which can saturate even the best-draining soil.

14. Soil and Repotting Frequency

Alocasia Polly should be repotted every 1–2 years to refresh the soil and accommodate growth. Use fresh, well-balanced soil each time to ensure the plant continues to thrive.

15. Conclusion

The right soil mix is essential for keeping your Alocasia Polly healthy and thriving. By focusing on drainage, moisture retention, and nutrient availability, you can replicate the plant’s natural tropical environment and enjoy its stunning foliage for years to come. Whether you choose to mix your own soil or use a pre-made option, understanding the needs of your Alocasia Polly is the first step to successful care. stands out as one of the most captivating varieties of Alocasia, drawing attention from plant collectors and enthusiasts worldwide. Native to the lush rainforests of Borneo, this plant embodies the exotic charm of its tropical origins. Its stunning foliage and unique growth patterns make it a prized addition to any plant collection. In this article, we’ll delve into the characteristics, care requirements, and fascinating features that set the Alocasia Sp Borneo apart from other varieties.

Philodendron vs. Alocasia: Understanding the Similarities and Differences 


Philodendron and Alocasia are two beloved houseplants known for their stunning foliage and ability to elevate any indoor space. While they may seem similar at first glance, these plants have distinct characteristics that set them apart. Whether you’re trying to decide which to add to your collection or simply curious about their differences, this guide will help you explore their similarities, care requirements, and unique traits.

1. Overview of Philodendron and Alocasia

– Philodendron: A diverse genus with over 480 species, known for their heart-shaped or deeply lobed leaves. They are prized for their adaptability and ease of care.

– Alocasia: A tropical plant native to Asia and Australia, featuring arrow- or shield-shaped leaves with dramatic textures and patterns.

2. Growth Habits

– Philodendron:

– Most are climbers, using aerial roots to attach to surfaces.

– Some species, like Philodendron Selloum, have a self-heading growth habit.

– Alocasia:

– Grows from tuberous rhizomes.

– Tends to form upright clumps with broad, striking leaves.

3. Leaf Characteristics

– Philodendron:

– Leaves are softer and tend to have a matte finish.

– Varieties like Philodendron Brasil have vibrant variegation.

– Alocasia:

– Leaves are more rigid and glossy with prominent veins.

– Varieties like Alocasia Zebrina have striking patterns and unique shapes.

4. Light Requirements

– Philodendron: Thrives in low to bright, indirect light. Ideal for spaces with filtered sunlight.

– Alocasia: Requires bright, indirect light and struggles in low-light conditions.

5. Watering Needs

– Philodendron:

– Moderate watering; let the topsoil dry out between watering sessions.

– More drought-tolerant than Alocasia.

– Alocasia:

– Prefers consistently moist soil but cannot tolerate waterlogging.

– Requires careful attention to avoid root rot.

6. Temperature and Humidity

Both plants are tropical and have similar preferences:

– Temperature: 65°F–85°F (18°C–29°C). Avoid drafts and extreme cold.

– Humidity: Both thrive in high humidity (above 60%). Alocasia, however, demands more consistent humidity than Philodendron.

7. Ease of Care

– Philodendron: Low-maintenance and beginner-friendly. Adaptable to various indoor environments.

– Alocasia: Requires more attention due to specific light, water, and humidity needs. Suitable for more experienced plant owners.

8. Fertilization Requirements

– Philodendron:

– Fertilize monthly during the growing season with a balanced liquid fertilizer.

– Can tolerate less frequent feeding.

– Alocasia:

– Requires consistent feeding every 2–4 weeks during growth periods for vibrant foliage.

9. Pest Susceptibility

– Philodendron: Rarely affected by pests but occasionally encounters spider mites or mealybugs.

– Alocasia: More prone to pests like spider mites, aphids, and thrips, especially in low-humidity conditions.

10. Propagation Methods

– Philodendron:

– Propagation through stem cuttings is simple and highly successful.

– Aerial roots often make propagation easier.

– Alocasia:

– Propagated through rhizome division.

– More challenging compared to Philodendron.

11. Common Varieties to Explore

– Popular Philodendron Varieties:

– Philodendron Brasil (variegated leaves).

– Philodendron Birkin (white-striped foliage).

– Philodendron Micans (velvety texture).

– Popular Alocasia Varieties:

– Alocasia Polly (compact and beginner-friendly).

– Alocasia Zebrina (striped stems).

– Alocasia Dragon Scale (textured, metallic leaves).

12. Decorative Appeal

– Philodendron:

– Perfect for cascading from shelves or climbing up trellises.

– Adds a lush, green aesthetic to any room.

– Alocasia:

– Makes a bold statement as a standalone plant with its dramatic leaves.

– Ideal for minimalist or tropical decor themes.

13. Dormancy Periods

– Philodendron: Continues to grow year-round in the right conditions.

– Alocasia: May go dormant during colder months, shedding leaves and reducing growth.

14. Price and Availability

– Philodendron: Generally more affordable and widely available. Rare varieties may be pricier.

– Alocasia: Can be expensive, especially for rare varieties like Alocasia Dragon Scale.

15. Which Plant is Right for You?

– Choose Philodendron if:

– You’re a beginner or looking for a low-maintenance plant.

– You want a versatile plant that adapts well to different environments.

– Choose Alocasia if:

– You’re an experienced plant parent ready for a challenge.

– You love dramatic, bold foliage and have the time to meet its care needs.

Conclusion

Both Philodendron and Alocasia are beautiful, rewarding plants that can elevate your indoor space. While Philodendron offers ease and adaptability, Alocasia brings drama and tropical flair. Understanding their differences ensures you choose the right plant for your home and skill level. Whichever you select, both are sure to bring life and elegance to your indoor garden.

The Alocasia Polly, also known as the African Mask Plant, is a stunning houseplant prized for its striking foliage and unique veined patterns. However, like many tropical plants, its health and vibrancy heavily depend on the soil it’s planted in. Providing the right soil mix ensures proper drainage, aeration, and nutrient availability, all of which are crucial for the plant’s long-term growth and health. This guide will help you understand the ideal soil conditions for Alocasia Polly and how to prepare the perfect mix for optimal growth. Alocasia Polly is native to tropical rainforests, where the soil is rich, well-draining, and consistently moist. Mimicking these conditions in your potting mix is key to preventing common issues like root rot or nutrient deficiencies. The right soil mix is essential for keeping your Alocasia Polly healthy and thriving. By focusing on drainage, moisture retention, and nutrient availability, you can replicate the plant’s natural tropical environment and enjoy its stunning foliage for years to come. Whether you choose to mix your own soil or use a pre-made option, understanding the needs of your Alocasia Polly is the first step to successful care.

Planting Alocasia: A Step-by-Step Guide for Beginners 

Alocasia plants, with their dramatic foliage and tropical charm, are perfect additions to any home or garden. However, for new plant enthusiasts, the process of planting these beauties might seem a bit daunting. From choosing the right soil to ensuring proper lighting, each step plays a crucial role in the plant’s success. This comprehensive guide will walk you through every detail, ensuring that your Alocasia thrives and becomes the star of your indoor or outdoor garden.

1. Understanding Alocasia Varieties

Before planting, familiarize yourself with the specific Alocasia variety you’re working with.

– Popular Varieties for Beginners:

– Alocasia Polly: Compact and easy to manage.

– Alocasia Zebrina: Known for its striking patterned stems.

– Alocasia Macrorrhiza: Ideal for larger spaces due to its size.

2. Selecting the Right Pot

Choosing the appropriate pot is essential for the plant’s growth.

– Size Matters: Pick a pot slightly larger than the plant’s root ball to allow room for growth.

– Drainage: Ensure the pot has drainage holes to prevent waterlogging.

– Material: Terra-cotta pots are excellent for regulating moisture, while plastic pots retain water better.

3. Preparing the Soil Mix

Alocasias thrive in well-draining, nutrient-rich soil.

– Recommended Soil Mix:

– 50% potting soil.

– 25% perlite or pumice for aeration.

– 25% orchid bark or coconut coir for organic matter.

– pH Range: Aim for a slightly acidic to neutral pH (6.0–7.0).

4. Choosing the Right Location

Light and temperature play significant roles in the success of your Alocasia.

– Light Requirements: Bright, indirect light is ideal. Direct sunlight can scorch the leaves.

– Temperature Range: Maintain temperatures between 65°F and 85°F (18°C–29°C).

– Indoor Placement: Near an east or north-facing window works best.

5. Planting Your Alocasia: Step-by-Step

Follow these steps to plant your Alocasia correctly:

  1. Prepare the Pot: Fill the pot with the prepared soil mix, leaving enough room for the root ball.
  2. Position the Plant: Gently place the Alocasia in the pot, ensuring the base of the plant is level with the soil surface.
  3. Fill the Pot: Add more soil around the roots, pressing gently to secure the plant.
  4. Water Thoroughly: After planting, water the plant until moisture drains from the bottom of the pot.

6. Watering Tips

Proper watering is crucial for Alocasias.

– When to Water: Check the top 1–2 inches of soil. If dry, it’s time to water.

– How to Water: Water evenly until it drains from the pot’s base. Discard any excess water in the saucer.

– Avoid Overwatering: Soggy soil can lead to root rot, a common issue for Alocasias.

7. Fertilizing Your Alocasia

Fertilization provides the nutrients needed for robust growth.

– Frequency: Fertilize every 4–6 weeks during spring and summer.

– Type: Use a balanced liquid fertilizer diluted to half strength.

– Avoid Fertilizing: Skip during the dormant period (fall and winter).

8. Humidity Requirements

Alocasias thrive in humid conditions, replicating their tropical origins.

– Ideal Humidity Level: Maintain at least 60% humidity.

– Boosting Humidity:

– Place a humidifier near the plant.

– Group plants together to create a microclimate.

– Use a pebble tray with water under the pot.

9. Caring for Newly Planted Alocasia

After planting, extra care is needed to help the plant settle.

– Monitor Growth: Keep an eye on new leaves as a sign of healthy adaptation.

– Adjust Watering: Be cautious not to overwater during the first few weeks.

– Light Exposure: Ensure consistent, bright, indirect light.

10. Pruning and Maintenance

– Remove Yellowing Leaves: Cut off any leaves that turn yellow to encourage fresh growth.

– Clean Leaves: Wipe with a damp cloth to remove dust and enhance photosynthesis.

11. Repotting Your Alocasia

Alocasas should be repotted every 1–2 years or when they outgrow their pot.

– Signs It’s Time to Repot:

– Roots growing out of the drainage holes.

– Soil dries out too quickly after watering.

– Repotting Steps:

– Use a larger pot and fresh soil.

– Handle roots gently to avoid damage.

12. Common Problems and Solutions

– Yellowing Leaves: Often caused by overwatering or inadequate light.

– Drooping Leaves: Indicates underwatering or sudden temperature changes.

– Pest Issues: Treat spider mites or mealybugs with neem oil or insecticidal soap.

13. Propagating Alocasia

Expand your collection with propagation.

– Division Method:

– Separate offsets (baby plants) during repotting.

– Ensure each division has a healthy root system.

– Plant in fresh soil and water lightly.

14. Decorating with Alocasia

Alocasia plants make stunning decor additions.

– Indoor Placement: Use as a centerpiece in living rooms or offices.

– Pot Styling: Pair with minimalist or tropical-themed pots to enhance its beauty.

15. Why Plant Alocasia?

– Tropical Vibes: Adds an exotic feel to your home or garden.

– Air Purification: Improves indoor air quality.

– Low Maintenance: Suitable for beginners when proper care is provided.

Conclusion

Planting Alocasia doesn’t have to be intimidating. With the right tools, knowledge, and care, you can enjoy the beauty and charm of this tropical wonder in your home or garden. By following this step-by-step guide, even beginners can confidently plant and nurture Alocasia varieties, ensuring they thrive and grow into stunning focal points. Happy planting!

Whether you’re trying to decide which to add to your collection or simply curious about their differences, this guide will help you explore their similarities, care requirements, and unique traits.

Caring for Alocasia Wentii: Essential Tips for Thriving Indoor Plants 

The Alocasia Wentii, often admired for its glossy, heart-shaped leaves and vibrant green tones, is a stunning addition to any indoor garden. Known for its resilience and adaptability, this plant is perfect for beginners and seasoned gardeners alike. Native to tropical Asia, the Alocasia Wentii thrives in warm, humid environments, making it ideal for indoor care. However, to ensure its health and vibrancy, proper care is essential. This guide provides practical tips for nurturing Alocasia Wentii and helping it flourish in your home.

1. Getting to Know Alocasia Wentii

Before diving into care tips, it’s helpful to understand the unique characteristics of this plant.

Distinct Features:

– Glossy, arrow-shaped leaves with burgundy undersides.

– Compact size, perfect for indoor spaces.

– Origin: Tropical rainforests, where it grows under dappled light.

2. Optimal Light Conditions

– Bright, Indirect Light: Alocasia Wentii thrives in filtered sunlight, mimicking the forest canopy.

– Avoid Harsh Sunlight: Prolonged exposure to direct sunlight can scorch its leaves.

– Low-Light Tolerance: While adaptable, growth may slow in low-light environments.

3. Temperature and Humidity

– Temperature Range: Maintain indoor temperatures between 65°F and 80°F (18°C to 27°C).

– Humidity: High humidity (60–80%) is ideal, but the plant can tolerate moderate levels.

– Improving Humidity:

– Use a humidifier or mist the plant regularly.

– Place it near other plants to create a microclimate.

4. Watering Guidelines

– Consistency is Key: Water when the top 1–2 inches of soil feel dry.

– Avoid Overwatering: Excess water can cause root rot, a common issue for Alocasias.

– Seasonal Adjustments: Reduce watering frequency during the plant’s dormant phase in winter.

5. Choosing the Right Soil

– Well-Draining Mix:Use a soil blend of potting soil, perlite, and orchid bark to promote drainage.

– Nutrient-Rich Soil: A balanced soil mix supports healthy growth.

– Pot Choice: Ensure the pot has drainage holes to prevent waterlogging.

6. Fertilizing Alocasia Wentii

– Frequency: Fertilize every 4–6 weeks during the growing season (spring and summer).

– Type: Use a balanced liquid fertilizer diluted to half strength.

– Avoid Over-Fertilization: Excess nutrients can lead to leaf burn or weakened growth.

7. Repotting Alocasia Wentii

Repotting ensures the plant has room to grow and prevents it from becoming root-bound.

– When to Repot: Every 1–2 years or when roots outgrow the pot.

– Steps to Repot:

  1. Gently remove the plant from its current pot.
  2. Loosen the roots and trim any damaged sections.
  3. Place in a slightly larger pot with fresh soil.

8. Pest Prevention and Treatment

– Common Pests: Watch for spider mites, mealybugs, and aphids.

– Prevention:

– Wipe leaves regularly to keep them clean.

– Inspect the plant during watering sessions.

– Treatment: Use neem oil or insecticidal soap for infestations.

9. Dealing with Dormancy

Like many Alocasias, the Wentii may enter a dormant phase during cooler months.

– Signs of Dormancy: Slower growth and occasional leaf loss.

– Care During Dormancy:

– Reduce watering and stop fertilizing.

– Maintain warmth and humidity until new growth resumes in spring.

10. Pruning and Maintenance

– Prune Regularly: Remove yellowing or damaged leaves to encourage new growth.

– Clean Leaves: Dust can block sunlight absorption; wipe leaves with a damp cloth.

11. Propagation Techniques

Expand your collection through propagation.

– Best Method: Division during repotting.

– Steps for Propagation:

  1. Separate offsets with roots from the mother plant.
  2. Pot each division in fresh soil.
  3. Water lightly and place in a warm, humid environment.

12. Common Problems and Solutions

– Yellowing Leaves: Indicates overwatering or poor drainage.

– Drooping Leaves: Often caused by underwatering or sudden temperature changes.

– Brown Tips: Low humidity or fertilizer buildup may be to blame.

13. Decorating with Alocasia Wentii

– Indoor Placement: Ideal for living rooms, offices, or shaded patios.

– Pot Style: Pair with decorative pots to highlight its glossy leaves.

14. Why Alocasia Wentii is Perfect for Indoor Gardens

– Low Maintenance: Suitable for beginners.

– Visual Impact: Adds a tropical touch to any space.

– Air-Purifying Benefits: Improves indoor air quality.

Conclusion

Caring for Alocasia Wentii is both rewarding and straightforward with the right approach. By providing optimal lighting, humidity, and watering, you can ensure this tropical beauty thrives indoors. Whether you’re an experienced gardener or just starting, the Alocasia Wentii makes a stunning addition to any plant collection, offering elegance and charm year-round.

Philodendron and Alocasia are two beloved houseplants known for their stunning foliage and ability to elevate any indoor space. While they may seem similar at first glance, these plants have distinct characteristics that set them apart. Whether you’re trying to decide which to add to your collection or simply curious about their differences, this guide will help you explore their similarities, care requirements, and unique traits.

Both Philodendron and Alocasia are beautiful, rewarding plants that can elevate your indoor space. While Philodendron offers ease and adaptability, Alocasia brings drama and tropical flair. Understanding their differences ensures you choose the right plant for your home and skill level. Whichever you select, both are sure to bring life and elegance to your indoor garden. The Alocasia Polly, also known as the African Mask Plant, is a stunning houseplant prized for its striking foliage and unique veined patterns. However, like many tropical plants, its health and vibrancy heavily depend on the soil it’s planted in. Providing the right soil mix ensures proper drainage, aeration, and nutrient availability, all of which are crucial for the plant’s long-term growth and health. This guide will help you understand the ideal soil conditions for Alocasia Polly and how to prepare the perfect mix for optimal growth.

Alocasia Tigrina Variegated: An Exotic Treasure for Your Plant Collection 


The Alocasia Tigrina Variegated is a true gem for rare plant collectors. Known for its striking, tiger-striped stems and beautifully variegated leaves, this plant is a statement piece that exudes elegance and rarity. Native to tropical rainforests, this variety demands attention with its elongated, arrow-shaped foliage marked by creamy white and green marbling. As one of the most sought-after Alocasias, understanding its unique traits and specific care requirements is essential for enthusiasts eager to add it to their collection. In this guide, we’ll explore what makes this plant extraordinary and how to care for it effectively.

1. The Allure of Alocasia Tigrina Variegated

This plant’s rare variegation and bold stem patterns make it a standout addition to any collection.

– Key Features:

– Tiger-like patterns on its stems.

– Stunning leaf variegation with cream and green hues.

– Graceful, elongated foliage resembling spears.

2. Native Habitat of Alocasia Tigrina Variegated

Understanding its origins helps replicate its natural environment.

– Region: Tropical rainforests of Southeast Asia.

– Climate: High humidity, warm temperatures, and dappled light.

3. Light Requirements

Proper lighting is critical for maintaining its variegation.

– Bright, Indirect Light: Essential to prevent leaf scorching.

– Avoid Direct Sunlight: Harsh rays can cause the delicate variegation to fade.

– Supplemental Light: Grow lights can be used in low-light conditions.

4. Ideal Temperature Range

Alocasia Tigrina Variegated thrives in warm temperatures between 65°F and 85°F (18°C–29°C).

– Consistency: Avoid sudden temperature fluctuations.

– Cold Intolerance: Never expose it to temperatures below 60°F (15°C).

5. Humidity Preferences

High humidity is a must for this tropical beauty.

– Optimal Level: Maintain humidity between 60% and 80%.

– Boosting Humidity: Use a humidifier, mist regularly, or place the plant near a pebble tray.

6. Watering Routine

Getting the balance right is essential to avoid overwatering or underwatering.

– Frequency: Water when the top 2–3 inches of soil feel dry.

– Avoid Stagnant Water: Ensure excess water drains to prevent root rot.

– Water Quality: Use filtered or distilled water to avoid mineral buildup.

7. Soil Mix for Healthy Growth

A well-draining, aerated soil mix is crucial for this Alocasia.

– Recommended Mix: Combine potting soil, perlite, and orchid bark.

– pH Range: Slightly acidic to neutral (6.0–7.0).

8. Fertilization Needs

Fertilize to support healthy growth and maintain variegation.

– Type: Use a balanced liquid fertilizer with a ratio like 10-10-10.

– Frequency: Feed every 4–6 weeks during the growing season (spring and summer).

– Dilution: Always dilute fertilizer to avoid overfeeding.

9. Repotting Alocasia Tigrina Variegated

Repotting helps the plant grow without constraints.

– When to Repot: Every 1–2 years or when roots outgrow the pot.

– Choosing a Pot: Opt for a container with good drainage.

10. Pest Management

Like other Alocasias, this variety is susceptible to pests like spider mites and mealybugs.

– Prevention: Inspect leaves regularly and keep them clean.

– Treatment: Use neem oil or insecticidal soap if pests are detected.

11. Propagation Techniques

Propagating Alocasia Tigrina Variegated can be done through division.

– Best Time: During repotting in spring or summer.

– Method: Separate offsets with established roots and pot them in fresh soil.

12. Common Problems and Solutions

– Brown Leaf Edges: Indicates low humidity. Increase moisture levels around the plant.

– Yellowing Leaves: May result from overwatering. Check soil drainage and adjust watering practices.

– Loss of Variegation: Caused by insufficient light. Ensure bright, indirect lighting.

13. Decorating with Alocasia Tigrina Variegated

This plant’s dramatic appearance makes it a focal point.

– Ideal Placement: Display in living rooms or conservatories with ample indirect light.

– Complementary Decor: Pair with minimalist pots to emphasize its exotic look.

14. Rarity and Market Value

As a highly coveted plant, Alocasia Tigrina Variegated often commands a premium price.

– Factors Affecting Cost:

– Limited availability due to slow propagation.

– High demand among collectors.

– Investment Worthiness: Its rarity and beauty make it a valuable addition to any collection.

15. Long-Term Care and Enjoyment

Caring for Alocasia Tigrina Variegated is a rewarding experience. With proper attention to its needs, this plant can thrive for years, becoming a cherished part of your collection.

– Benefits of Long-Term Care:

– Adds an exotic touch to your indoor garden.

– Offers a unique conversation starter for guests.

Conclusion

The Alocasia Tigrina Variegated is more than just a plant it’s a living work of art. With its tiger-striped stems and mesmerizing variegation, it’s a true treasure for rare plant enthusiasts. While it demands specific care, the effort is well worth the reward. By following the tips outlined in this guide, you can enjoy the beauty of this exotic plant and ensure its healthy growth in your collection.

Caring for Alocasia Wentii is both rewarding and straightforward with the right approach. By providing optimal lighting, humidity, and watering, you can ensure this tropical beauty thrives indoors. Whether you’re an experienced gardener or just starting, the Alocasia Wentii makes a stunning addition to any plant collection, offering elegance and charm year-round.

Planting Alocasia doesn’t have to be intimidating. With the right tools, knowledge, and care, you can enjoy the beauty and charm of this tropical wonder in your home or garden. By following this step-by-step guide, even beginners can confidently plant and nurture Alocasia varieties, ensuring they thrive and grow into stunning focal points. Happy planting!

Caring for Alocasia Keris Papua: Tips for This Unique Variety 

Alocasia Keris Papua, with its dramatic, arrow-shaped leaves and distinct foliage, is a stunning addition to any plant enthusiast’s collection. This unique variety, native to Papua and neighboring tropical regions, has gained popularity for its striking appearance and exotic vibe. However, like many Alocasias, it requires specific care to thrive. Whether you’re a seasoned plant parent or a beginner, understanding the care needs of **Alocasia Keris Papua** is essential to keeping it healthy and vibrant. In this guide, we’ll provide detailed tips to ensure your plant flourishes in your home or garden.

1. Understanding Alocasia Keris Papua’s Natural Habitat

To care for Alocasia Keris Papua effectively, it’s important to know where it comes from. This plant thrives in tropical rainforests, where it experiences warm temperatures, high humidity, and indirect sunlight. Replicating these conditions at home is key to its success.

2. Ideal Light Conditions for Alocasia Keris Papua

– Bright, Indirect Light: This plant prefers filtered light, similar to the dappled sunlight of its natural forest canopy.

– Avoid Direct Sunlight: Direct sunlight can scorch its delicate leaves.

– Artificial Light Option: If natural light is limited, grow lights can be an effective alternative.

3. Temperature Requirements

Alocasia Keris Papua thrives in warm environments. Aim to maintain a consistent temperature between 65°F and 80°F (18°C to 27°C).

– Avoid Cold Drafts: Sudden temperature drops can stress the plant.

– Consistency is Key: Extreme fluctuations can harm its growth.

4. Humidity Needs

High humidity is essential for Alocasia Keris Papua.

– Recommended Humidity Level: Aim for 60–80%.

– Increase Humidity: Use a humidifier, mist the leaves, or place the plant near a pebble tray filled with water.

– Grouping Plants: Positioning multiple plants together can naturally boost humidity.

5. Watering Schedule

Getting the watering routine right is critical.

– Moderate Watering: Water when the top 1–2 inches of soil feel dry.

– Avoid Overwatering: Alocasias are prone to root rot if left in soggy soil.

– Drainage Tip: Ensure the pot has drainage holes to prevent waterlogging.

6. Choosing the Right Soil

Alocasia Keris Papua thrives in well-draining, nutrient-rich soil.

– Ideal Mix: Combine potting soil with perlite or orchid bark for better aeration.

– Acidic to Neutral pH: A soil pH of 6.0–7.0 is ideal.

7. Fertilization Tips

To support its growth, fertilize Alocasia Keris Papua regularly.

– Frequency: Feed with a balanced liquid fertilizer every 4–6 weeks during the growing season (spring and summer).

– Dilution: Always dilute fertilizer to half strength to prevent chemical burns.

– Skip in Dormancy: Avoid fertilizing during fall and winter when the plant’s growth slows down.

8. Pruning and Maintenance

Regular pruning keeps the plant healthy.

– Remove Yellowing Leaves: Cut off any damaged or yellowing leaves to redirect energy to healthy growth.

– Sterilize Tools: Use clean, sharp scissors or pruners to prevent infections.

9. Repotting Alocasia Keris Papua

Repotting ensures the plant has room to grow.

– When to Repot: Repot every 1–2 years or when roots outgrow the pot.

– Choose the Right Pot: Use a pot slightly larger than the current one to avoid overwatering issues.

10. Pest Management

Alocasia Keris Papua can be susceptible to pests like spider mites, mealybugs, and aphids.

– Prevention: Regularly wipe leaves with a damp cloth to keep pests at bay.

– Treatment: Use insecticidal soap or neem oil if an infestation occurs.

11. Managing Dormancy Periods

This variety may enter dormancy during colder months.

– Signs of Dormancy: Slower growth and occasional leaf drop.

– Care During Dormancy: Reduce watering and stop fertilizing until new growth emerges in spring.

12. Propagation Techniques

Propagating Alocasia Keris Papua can help you grow your collection.

– Division Method: The most effective way is dividing the plant during repotting.

– Ensure Root Health: Make sure each division has healthy roots and at least one growing point.

13. Common Problems and Solutions

– Yellowing Leaves: Indicates overwatering or poor drainage. Adjust watering practices.

– Brown Leaf Edges: Often a sign of low humidity. Increase humidity levels.

– Wilting Leaves: Check for root rot or pest infestations.

14. Decorating with Alocasia Keris Papua

This plant’s dramatic leaves make it a statement piece.

– Ideal Placement: Display it in living rooms or office spaces with bright, indirect light.

– Pairing with Pots: Use decorative pots to enhance its natural beauty.

15. Why Invest in Alocasia Keris Papua?

Alocasia Keris Papua is more than just a plant; it’s a conversation starter and a visual delight. Caring for this unique variety is a rewarding experience, offering a slice of the tropics in your home.

By following these care tips, you can ensure that Alocasia Keris Papua thrives in your space. With proper attention to light, humidity, and watering, this exotic beauty will remain healthy and vibrant for years to come. Whether you’re an experienced plant parent or a beginner, this guide equips you with all the knowledge you need to nurture this captivating variety. Known for its striking, tiger-striped stems and beautifully variegated leaves, this plant is a statement piece that exudes elegance and rarity. Native to tropical rainforests, this variety demands attention with its elongated, arrow-shaped foliage marked by creamy white and green marbling. As one of the most sought-after Alocasias, understanding its unique traits and specific care requirements is essential for enthusiasts eager to add it to their collection. In this guide, we’ll explore what makes this plant extraordinary and how to care for it effectively.

Alocasia Lumiere: A Guide to Caring for This Striking Variety


Alocasia Lumiere is a beautiful and eye-catching variety of the Alocasia family, known for its striking, glossy, and richly textured leaves. This plant’s unique aesthetic makes it a favorite among collectors and indoor gardeners. However, like all Alocasia species, it requires proper care and attention to thrive indoors. In this comprehensive guide, we’ll cover everything you need to know about Alocasia Lumiere’s care, from ideal lighting and watering conditions to the best soil and common issues you may encounter. Whether you’re an experienced plant owner or a novice gardener, this article will equip you with the knowledge to keep your Alocasia Lumiere vibrant and healthy.

1. What Makes Alocasia Lumiere Unique?

Understand the distinct characteristics of Alocasia Lumiere and what sets it apart from other varieties of Alocasia, making it a must-have for plant collectors.

2. The Ideal Light Conditions for Alocasia Lumiere

Discover how to create the perfect lighting environment for Alocasia Lumiere, which thrives in bright, indirect light for its vibrant growth.

3. How to Water Alocasia Lumiere Correctly

Learn the proper watering techniques to avoid overwatering or underwatering, which can lead to common problems such as root rot or dry leaves.

4. Choosing the Right Soil for Alocasia Lumiere

Alocasia Lumiere requires well-draining, aerated soil. This section explains the ideal soil mix for your plant’s growth and longevity.

5. Temperature and Humidity Requirements for Alocasia Lumiere

Understand the ideal temperature and humidity conditions to keep your Alocasia Lumiere thriving year-round.

6. How Often Should You Fertilize Alocasia Lumiere?

Fertilizing your Alocasia Lumiere is essential to promote healthy growth. Learn how often to fertilize and the best fertilizers for this plant.

7. Pruning Alocasia Lumiere for Health and Aesthetics

Discover the best practices for pruning your Alocasia Lumiere, removing dead leaves, and encouraging healthy new growth.

8. Common Pests and Diseases in Alocasia Lumiere

Alocasia Lumiere is susceptible to certain pests and diseases. Learn how to spot these issues early and how to treat them effectively.

9. Repotting Alocasia Lumiere: When and How to Do It

As your plant grows, it may need to be repotted. This section will guide you on when and how to repot your Alocasia Lumiere to keep it thriving.

10. Signs of Stress in Alocasia Lumiere

Learn how to identify signs of stress in your Alocasia Lumiere, including wilting leaves, yellowing, and stunted growth, and how to address them.

11. Propagating Alocasia Lumiere: A Step-by-Step Guide

Explore how to propagate Alocasia Lumiere through stem cuttings and other propagation methods to grow more plants for your collection.

12. How to Deal with Yellowing Leaves in Alocasia Lumiere

Yellowing leaves are a common issue with Alocasia. Learn the causes of this and how to remedy it to keep your plant looking vibrant.

13. Alocasia Lumiere: The Right Pot Size for Healthy Growth

Choosing the correct pot size is critical for healthy root development. Find out how to choose the right pot size for your Alocasia Lumiere.

14. How to Handle Dormancy in Alocasia Lumiere

Alocasia Lumiere may go through a dormant phase, especially during the winter months. This section explains how to care for your plant during this period.

15. Troubleshooting Common Alocasia Lumiere Care Issues

Discover the most common care issues associated with Alocasia Lumiere and how to troubleshoot them to maintain a healthy and thriving plant.

Conclusion

Caring for Alocasia Lumiere can be a rewarding experience, especially for those who enjoy adding unique, beautiful plants to their indoor collections. By following the proper care instructions outlined in this guide, you can ensure that your Alocasia Lumiere remains vibrant, healthy, and a showstopper in your home. Whether you’re dealing with common issues like yellowing leaves or looking to propagate your plant, this comprehensive guide will provide you with the tools you need to care for your Alocasia Lumiere successfully. With the right care, your Alocasia Lumiere will continue to thrive and bring a touch of elegance to your indoor space.This unique variety, native to Papua and neighboring tropical regions, has gained popularity for its striking appearance and exotic vibe. However, like many Alocasias, it requires specific care to thrive. Whether you’re a seasoned plant parent or a beginner, understanding the care needs of **Alocasia Keris Papua** is essential to keeping it healthy and vibrant. In this guide, we’ll provide detailed tips to ensure your plant flourishes in your home or garden.Native to tropical rainforests, this variety demands attention with its elongated, arrow-shaped foliage marked by creamy white and green marbling. As one of the most sought-after Alocasias, understanding its unique traits and specific care requirements is essential for enthusiasts eager to add it to their collection. In this guide, we’ll explore what makes this plant extraordinary and how to care for it effectively.Known for its resilience and adaptability, this plant is perfect for beginners and seasoned gardeners alike. Native to tropical Asia, the Alocasia Wentii thrives in warm, humid environments, making it ideal for indoor care. However, to ensure its health and vibrancy, proper care is essential. This guide provides practical tips for nurturing Alocasia Wentii and helping it flourish in your home.

Exit mobile version